
NIST SP 800-115 remains one of the most referenced frameworks for planning and executing security assessments, yet many organisations struggle to translate its guidance into practical, repeatable processes. If you’re searching for NIST penetration testing guidelines, you likely need more than a summary of the document; you need a clear understanding of how to apply its methodology within your own environment, whether that’s to satisfy compliance requirements or genuinely strengthen your security posture.
SP 800-115, alongside controls defined in SP 800-53, outlines a structured approach to technical security testing, from scoping and rules of engagement through to execution, analysis, and reporting. The challenge is that the publication reads like a reference manual rather than a step-by-step playbook. Bridging that gap between theory and operational practice is where most teams get stuck.
At TrustedIA, penetration testing is a core part of our managed security services, and we regularly align our assessments with NIST guidance for clients who need that level of rigour. This article breaks the framework down into actionable steps, explains how each phase works in practice, and highlights where organisations commonly go wrong, so you can plan and execute pen tests that actually hold up to scrutiny.
What NIST expects from a penetration test
NIST does not treat penetration testing as a single activity with a fixed format. SP 800-115, formally titled Technical Guide to Information Security Testing and Assessment, defines pen testing as one component of a broader security assessment process that includes review techniques, target identification, and vulnerability analysis alongside actual exploitation. Understanding this distinction matters because it shapes how you scope, plan, and justify the work internally, not just to a security team but to leadership and auditors as well.
The two documents that govern NIST pen testing
The NIST penetration testing guidelines draw from two primary publications that work in parallel. SP 800-115 covers the technical execution of security assessments, defining the phases, techniques, and examiner responsibilities involved in a test. SP 800-53 operates at the control level, specifying the security requirements your systems must meet, and it creates the compliance context that often makes penetration testing mandatory in the first place. If you work in a federal environment or handle federal data, control CA-8 (Penetration Testing) under SP 800-53 directly requires you to conduct penetration testing on information systems. SP 800-53 tells you why you need to test, and SP 800-115 tells you how.
Reading SP 800-115 in isolation, without understanding the control requirements in SP 800-53, leaves you with a methodology but no compliance anchor.
The four phases SP 800-115 defines
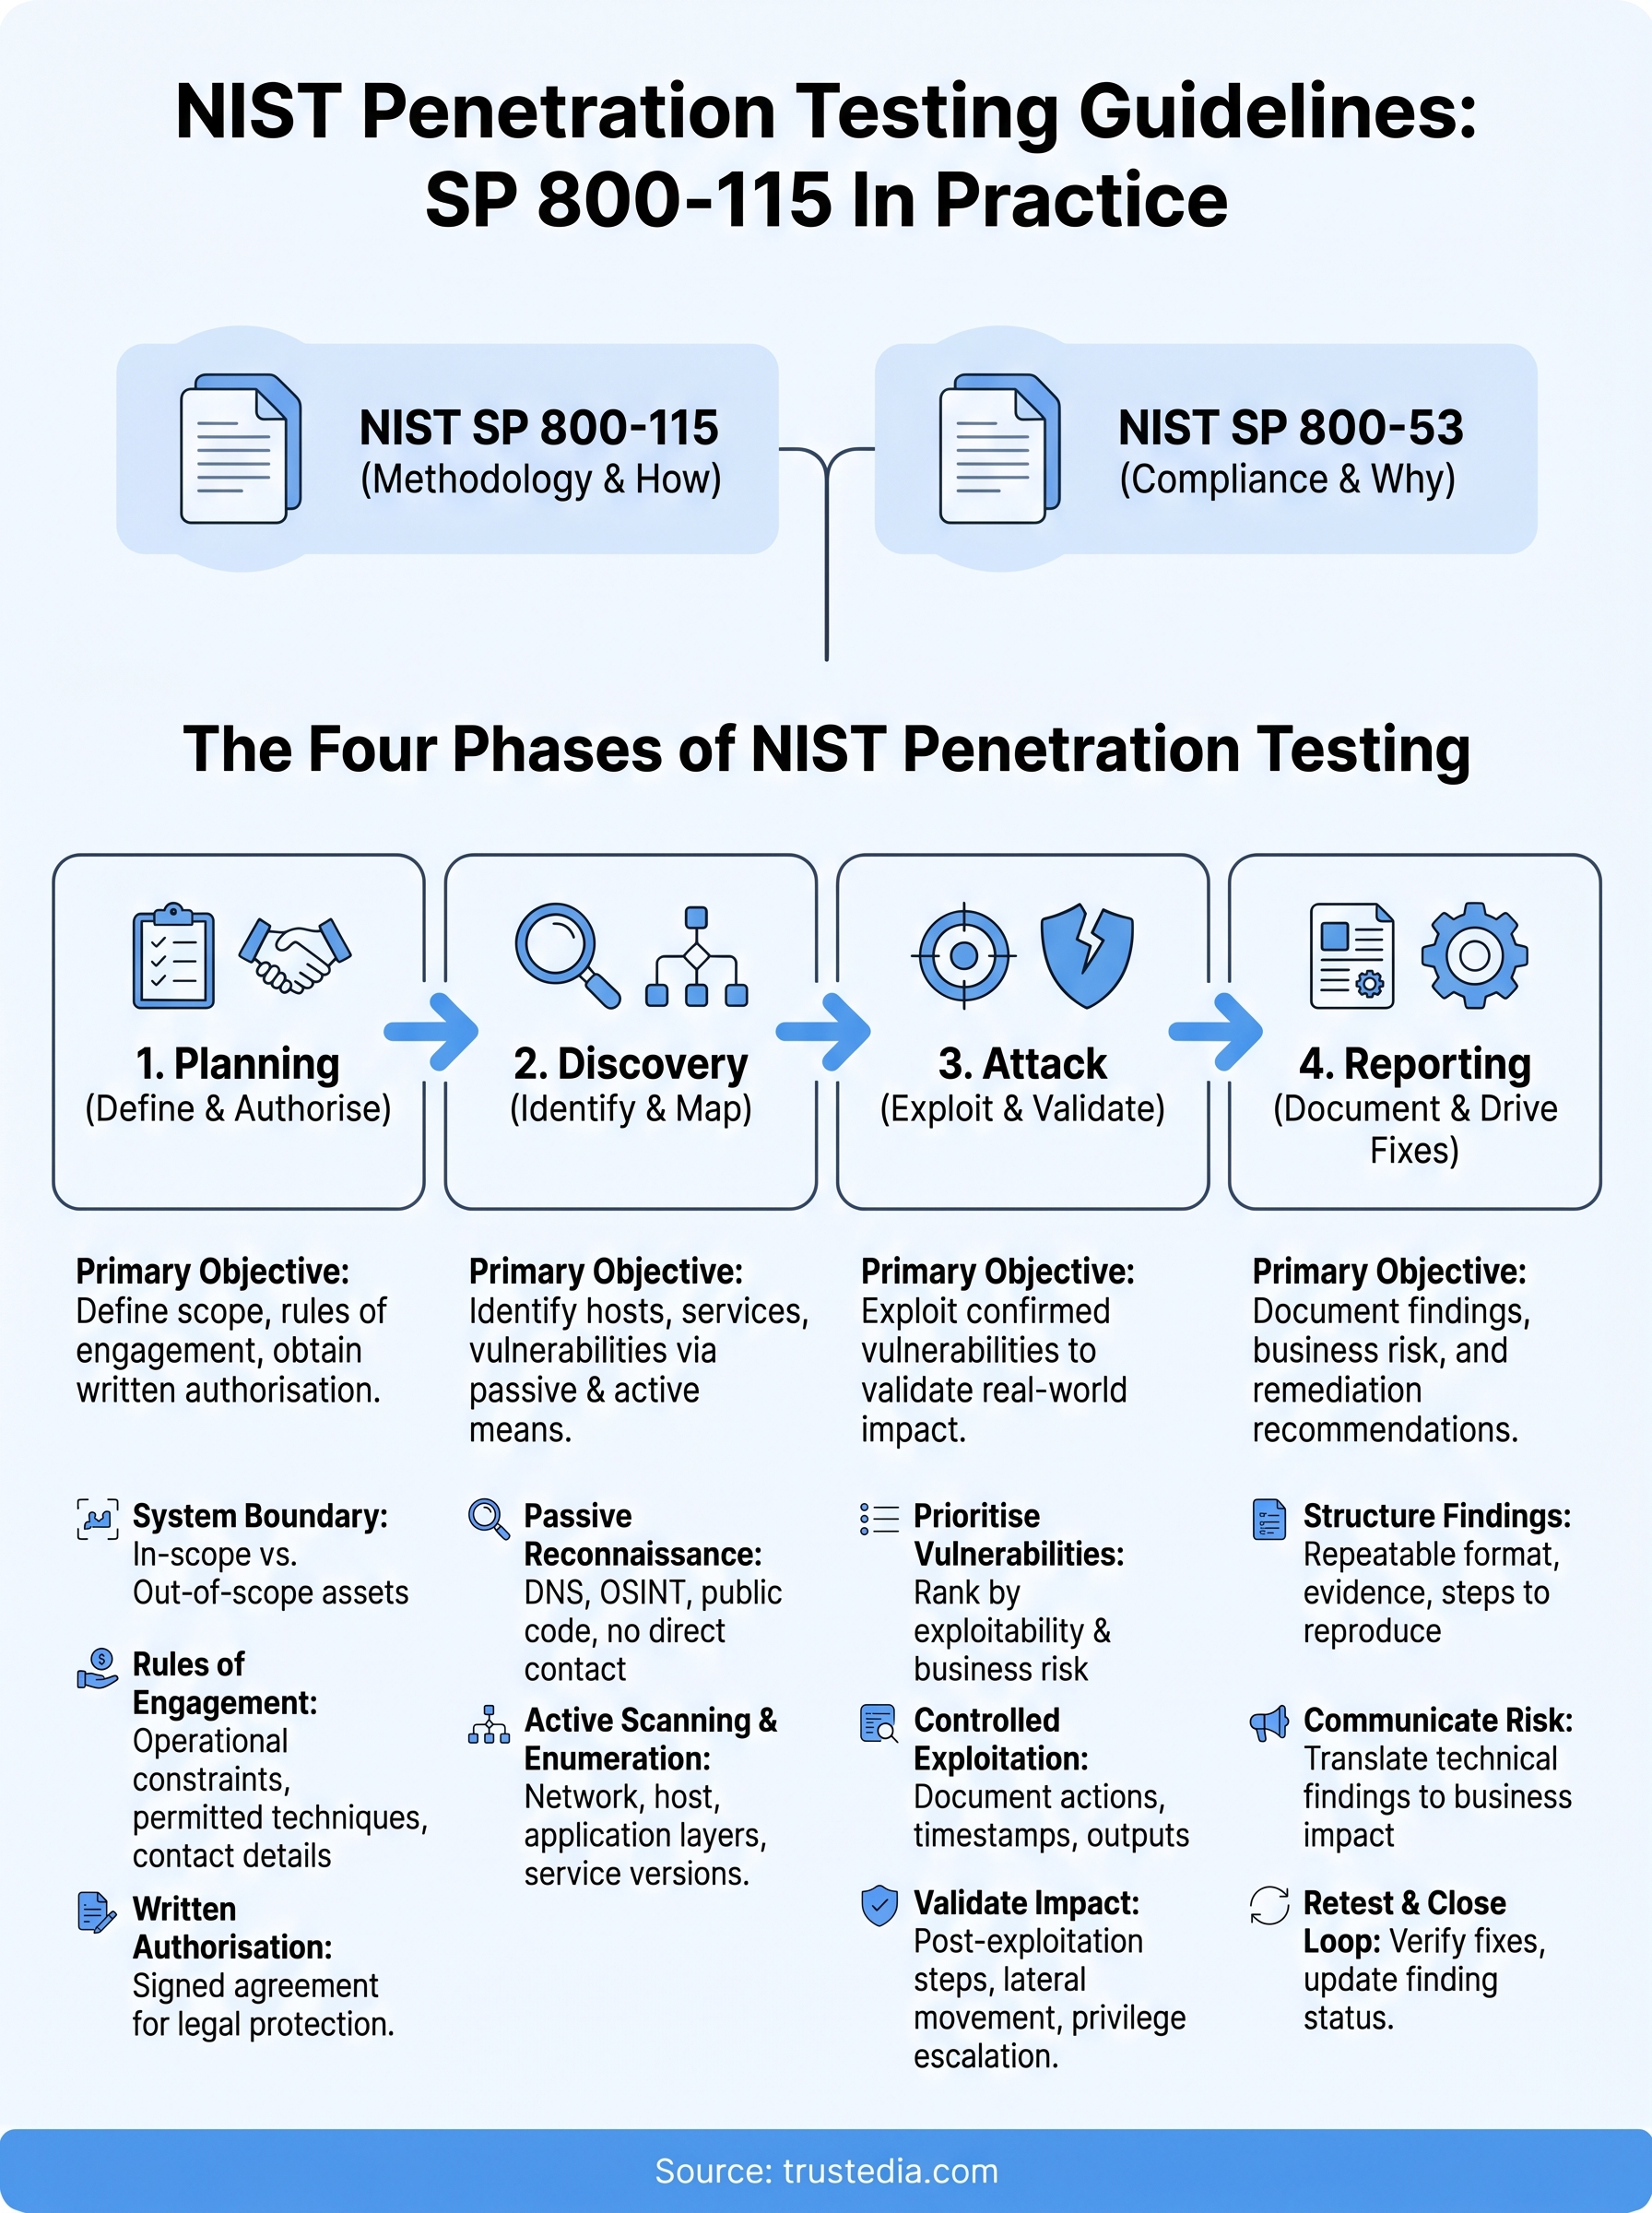
SP 800-115 organises penetration testing into four sequential phases: planning, discovery, attack, and reporting. Each phase has defined inputs, outputs, and responsibilities. NIST expects testers to move through each phase deliberately rather than jumping straight to exploitation, which is where many ad hoc assessments fall short. The planning phase receives significant attention in the document because poorly defined scope and authorisation are the most common causes of tests that produce misleading results or create legal exposure.

Here is how NIST maps each phase to its primary objective:
| Phase | Primary objective |
|---|---|
| Planning | Define scope, rules of engagement, and obtain written authorisation |
| Discovery | Identify hosts, services, and vulnerabilities through passive and active techniques |
| Attack | Exploit confirmed vulnerabilities to validate real-world impact |
| Reporting | Document findings, business risk, and remediation recommendations |
What NIST considers in-scope for a test
NIST draws a clear line between vulnerability scanning and actual penetration testing. Scanning identifies potential weaknesses; penetration testing attempts to exploit them to determine whether a weakness can lead to a real compromise. NIST expects your test to cover the network, host, and application layers, where relevant to the system boundary you have defined, and to account for physical security and social engineering where those attack vectors apply to your specific threat model.
Your test must also follow a defined set of rules of engagement that specify what systems can be targeted, what techniques are permitted, who must be notified during the test, and how incidents triggered during testing will be handled. Without these controls in place, a well-intentioned pen test can disrupt live services, create legal ambiguity, or produce results that no one inside the business can act on.
Step 1. Plan scope, rules, and authorisation
The planning phase is where most penetration tests fail before a single packet is sent. NIST places heavy emphasis on this stage because vague scope and missing authorisation are the two most common reasons a test produces results that either overstate or understate real risk. Before anyone touches a keyboard, you need a signed, written agreement that defines exactly what is being tested, what techniques are permitted, and who holds responsibility if something goes wrong.
Define your system boundary
Your system boundary determines everything that follows in the test. NIST expects you to document the specific IP ranges, hostnames, applications, and services included in the assessment, along with an explicit list of anything that is out of scope. A common mistake is scoping a test too broadly without checking whether third-party systems sit within the target range, which can create legal issues if you test infrastructure you do not own or control.
Use a simple scope document that captures:
- In-scope assets: IP addresses, domains, application URLs, cloud environments
- Out-of-scope assets: third-party services, production systems excluded for availability reasons
- Testing window: permitted hours and days for active testing
- Contact details: who to notify if a critical vulnerability is found during the test
Set your rules of engagement
Rules of engagement translate your scope into operational constraints that testers must follow throughout the assessment. Alongside the NIST penetration testing guidelines, your rules of engagement should specify which techniques are permitted, such as whether social engineering or denial-of-service testing is in or out of scope, and what testers must do if they accidentally cause a service disruption.
Written authorisation is not optional. Without a signed document confirming permission to test, you expose both your organisation and your testers to legal risk, regardless of how controlled the exercise is.
Below is a minimal rules of engagement template you can adapt:
Penetration Test - Rules of Engagement

Client organisation:
Test conducted by:
Authorised by (name and role):
Signature and date:

In-scope systems: [list]
Out-of-scope systems: [list]
Permitted techniques: [e.g. network scanning, exploitation, phishing simulation]
Excluded techniques: [e.g. DoS attacks, physical access]
Testing window: [dates and hours]
Emergency contact: [name, phone]
Incident handling: [steps if a system is disrupted]
Getting this document signed before testing starts protects everyone involved and gives your findings report a clear authorisation trail that auditors and insurers can verify.
Step 2. Gather information and map attack surfaces
The discovery phase in the NIST penetration testing guidelines covers two distinct activities: passive reconnaissance, where you collect information without directly interacting with your target systems, and active scanning, where you probe systems directly to enumerate hosts, open ports, and running services. Both activities feed into an attack surface map that shapes every decision you make during the exploitation phase.
Passive reconnaissance
Passive reconnaissance lets you gather intelligence about your target without triggering detection mechanisms or alerting administrators. Your goal here is to understand what information about your organisation is publicly accessible and how an attacker could use it before ever touching your network. This includes DNS records, WHOIS data, publicly exposed credentials in code repositories, job postings that reveal technology stacks, and SSL certificate transparency logs.
The more publicly visible your infrastructure is, the larger the attack surface you need to account for before active testing begins.
Common sources to check during passive reconnaissance:
- DNS records: identify subdomains, mail servers, and name servers
- Certificate Transparency logs: surface forgotten or misconfigured subdomains
- Public code repositories: check for exposed API keys or hardcoded credentials
- Job listings: reveal technology and platform choices that hint at your stack
Active scanning and enumeration
Once passive reconnaissance is complete, you move to active scanning, where you directly interact with in-scope systems to enumerate hosts, open ports, and running services. NIST expects you to document everything you find during this phase, including service versions, operating system fingerprints, and any banners that reveal configuration details, because this information determines which vulnerabilities are worth investigating in the next phase.

A structured enumeration approach covers three layers:
| Layer | What to enumerate |
|---|---|
| Network | Live hosts, open ports, protocols, firewall behaviour |
| Host | OS version, running services, patch level |
| Application | Login pages, API endpoints, input fields, and authentication mechanisms |
Work through each layer systematically before moving to exploitation. Skipping enumeration risks missing high-value targets or wasting time on vulnerabilities that do not exist in your specific environment. Document every finding in a centralised log that links directly back to the in-scope assets you defined during planning, so your findings report carries a clear, traceable evidence trail.
Step 3. Analyse, exploit, and validate weaknesses
The attack phase is where the NIST penetration testing guidelines become concrete. You take everything discovered during the enumeration phase and apply structured analysis to determine which weaknesses represent a genuine path to compromise. The goal is not to exploit every vulnerability you find but to validate whether a weakness translates into a real business risk, which requires prioritisation, controlled exploitation, and careful documentation of each step.
Prioritise vulnerabilities before you exploit
Not every vulnerability on your enumeration list deserves immediate attention. Before running a single exploit, rank your findings by exploitability and potential impact so you spend time on weaknesses that a real attacker would target first. Map each vulnerability against its CVSS score alongside your understanding of the specific environment, because a critical CVSS score on an isolated internal system carries less risk than a medium-severity flaw on an internet-facing login page.
Exploit the vulnerabilities most likely to give an attacker a foothold first, then chain findings together to demonstrate lateral movement or privilege escalation.
Use this prioritisation structure before moving to exploitation:
| Priority | Criteria |
|---|---|
| High | Internet-facing, unauthenticated access, known public exploit |
| Medium | Internal system requires credentials and limited lateral movement |
| Low | Minimal impact, difficult to exploit, no known public exploit |
Exploit with control and document every action
When you execute an exploit, record your exact commands, timestamps, and outputs in real time. NIST expects your evidence trail to be reproducible, which means someone reviewing your report must be able to replicate each step from your notes alone. Avoid techniques that carry a high risk of causing a system crash or data loss unless your rules of engagement explicitly permit them and you have confirmed a rollback plan with the system owner.
Validate impact through post-exploitation steps
After a successful exploit, your next task is to validate the real-world impact rather than stopping at the point of access. This means attempting privilege escalation, checking whether you can reach sensitive data, and testing whether you can move laterally to other in-scope systems. Each action you take post-exploitation should link back to a specific business risk, such as data exposure, operational disruption, or a compliance breach, so your findings carry genuine weight when you move into the reporting phase.
Step 4. Report results, drive fixes, and retest
The reporting phase is where your penetration test delivers its actual value. Following the NIST penetration testing guidelines, your report must give both technical and non-technical audiences a clear picture of what you found, what it means for the business, and what needs to happen next. A report that lists vulnerabilities without explaining their real-world impact gives your organisation almost nothing to act on.
Structure your findings report.
Your report needs a consistent structure so findings are repeatable, comparable across future tests, and useful to auditors. Each finding should stand on its own with enough detail to reproduce the issue, link it back to a specific system, and understand its severity. Use the following template as a baseline for every vulnerability entry:
Finding: [Short descriptive title]
Severity: [Critical / High / Medium / Low]
Affected system: [Hostname, IP, or application]
Description: [What the vulnerability is]
Evidence: [Screenshots, command output, or logs]
Steps to reproduce: [Numbered steps]
Business impact: [What an attacker could do if they exploited this]
Remediation: [Specific fix, not a general recommendation]
Remediation owner: [Team or individual responsible]
Target fix date: [Agreed deadline]
Apply this format consistently across every finding in the report so your remediation tracking stays manageable as your team works through the fix list.
Communicate risk to non-technical stakeholders.
Your technical findings need an executive summary that translates vulnerability details into business risk language. Decision-makers need to understand which systems carry the highest risk, what the operational impact of a breach would be, and what resources are needed to address the most critical findings. Keep this section to one or two pages and lead with your most severe findings rather than burying them in the body of the report.
A report that non-technical leadership cannot understand will not drive the remediation budget you need to fix what the test uncovered.
Retest and close the loop
Once your team has applied fixes, you need to retest each remediated finding to confirm the vulnerability no longer exists and that the fix has not introduced a new weakness. Schedule retests against a clear deadline tied to your remediation target dates rather than leaving them open-ended. Document retest outcomes in the same report format, updating each finding’s status to confirmed, partially fixed, or unresolved, so you carry a complete audit trail into your next assessment cycle.
Where to go from here
The NIST penetration testing guidelines provide a structured, defensible methodology, but the real work lies in applying each phase consistently, documenting your findings rigorously, and following through on remediation until every critical issue is closed. Working through SP 800-115 properly takes discipline, and it exposes gaps that many organisations did not know existed before they started.
If you have the internal resource to run assessments in-house, use the templates and structures in this guide as your starting point. If your team lacks the specialised expertise to execute the attack phase or produce findings that withstand auditor scrutiny, bringing in external support is the more reliable path. TrustedIA delivers penetration testing and vulnerability assessments aligned with NIST and ISO 27001 requirements, including full documentation and retesting. Find out how we can support your next assessment at TrustedIA Managed Security Services.